


Hello my dear friends,
unfortunately I hurt my back whilst shoveling snow on Sunday morning. That meant that I had to rest a lot by lying down, because sitting was the worst thing I could do. So whilst lying down I took the time to write up a tutorial of my hymn page feathers for you.

I love these feathers so much! When I look at them I imagine being embraced by them and any worries being taken away from me. I also imagine feelings of comfort, warmth and safety. I chose to use hymn pages because this is how I imagine Angels wings to look. What better choice than paper written with songs for God, made into angel feathers? Of course you can make these feathers out of music sheets, book pages, dictionary pages, or any other kind of paper that would suit you or your creation best.
The feathers are very easy to make, they take a little time, but you will love them when you are done. I have made a few feathers out of different papers so you can see what they will look like.
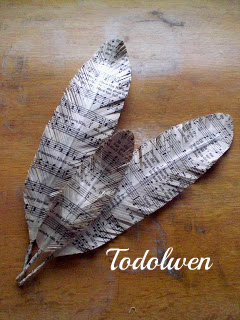
Some more hymn page feathers.

This feather was made from a very old German book. The writing is called "Alt Deutsche Schrift" ~ Old German Writing. My grandmother used to write like this and taught me how to read it.

This feather is made from a dictionary page.
Now let us start ...
this is what you will need:

- Hymn pages (music sheets, dictionary pages, book pages)
- Scissors
- Tacky glue
- Wire cutters
- Cloth stem wire wire 22 gauge (mine was 45 cms long)
- Piece of card for the template
- A pencil
To start off with, print out the template. I have given you 2 sizes, a larger feather and a smaller one. I will have all measurements listed for both of them.

Cut a piece of wire 35cms/20cms long long and bend the wire in half, so that one end is 3cms longer than the other.
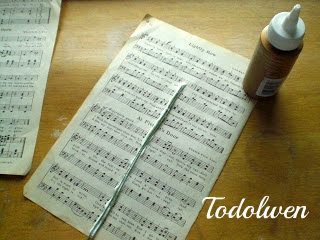
Take a piece of paper of your choice, and draw a line of glue down the center and place your wire into the glue, leaving the single piece of wire of 3cms out at the bottom.

Now place your second sheet of paper on top of the first, press it down firmly and leave it to completely dry.
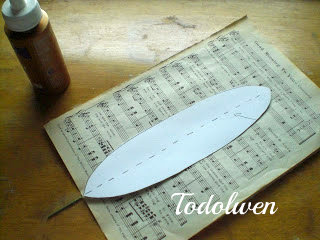
After it is dry, cut out your template and lay it on your sheet with the wire centered and draw around it ~ now you can cut the feather shape out.
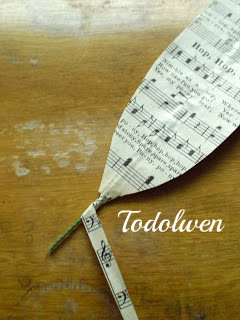
Next cut a fine strip of paper about 5 mm wide and the length of a page, spread some glue on it and wrap it around the uncovered wire, starting at the top. When you get to the end of the wire, wrap it around one last time, cut it the excess off and let it dry again.

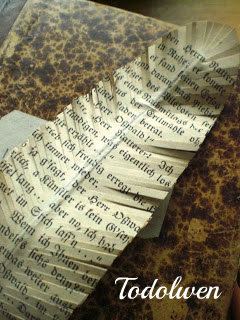
Now comes the fun part! Taking a pair of sharp scissors, and cut fine diagonal lines into your feather towards the center where the wire is but be sure to not cut all the way down to the wire. Cut all the way around your feather... and voila you are done!!! Sit back and take a look at your beautiful creation!
I hope you have enjoyed this tutorial as much as I have making it for you and just remember that these feathers will be delicate after you have made them - they are made from paper after all!
And last but not least ...
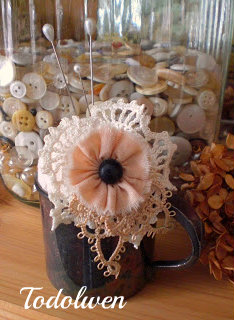
... a new pincushion I would like to share with you.
Made from a vintage baby cup, some old lace and a boot button for the center of the flower. I love the look of old tarnished things! I always wonder who they used to belong to so many years ago.
Have a peaceful and creative day,
Karen B.
Great tutorial sweetie.
ReplyDeleteI'll be sharing with my readers. =)
blessings
barbara jean
Popped over from Treasures From the Heart. I'm so glad she linked to you! Inspired to make some feathers, but first, can't wait to see the rest of your blog.
ReplyDeleteWhat a fun project! I remember making feathers out of construction paper as kids. You angel wings are beautiful.
ReplyDeletep.s. - Hope the back is feeling better!
ReplyDeleteOh, thank you for posting this. What a gift!
ReplyDeleteThese are fabulous...can't wait to give them a try!
ReplyDeletexojanis
Thanks for the wonderful tutorial! I'm going to have to try this now!
ReplyDeleteHave a great Thursday!
Blessings,
Sonya
So glad you showed us how to make those feathers!!! I tried a few weeks ago, but didn't do it right.....now I'll try again!!! Hope you are feeling better...hugs...cleo
ReplyDeletewhat a lovely project. thanks for making a tutorial!
ReplyDeleteKaren!!!! You are AMAZING GIRL!!! This is such a beautiful tutorial...I just have to try making these ~ I hope you don't mind, but had to share it with everyone :) Hope all is well with you sweet friend, hugs and love, Dawn
ReplyDeleteVery beautiful! Thank you for tutorial!
ReplyDeleteAmazing I just love how pretty the feathers are. Thanks so much for sharing the tutorial. Can't wait to give this a try. Blessings, Vicky
ReplyDeleteWhen I saw your feather on Dawn's blog, I thought "Oh how pretty!". I love your idea, and I thank you kindly for sharing your "how to".
ReplyDeleteI LOVE THIS!!!!! Thank you so much!!! Dawn sent us all over!! Hope your back is feeling better. Been there. NO fun at all.
ReplyDeleteHugs, Diane
PS: I'll be back. I love your blog!
What a fabulous tutorial! I am going to make some today!
ReplyDeleteP.S. A fellow Canadian blogger after my own heart. So pleased to have met you by way of Dawn at the Feathered Nest.
So very sweet! I came over from Rust & ruffles :)
ReplyDeleteThank you for sharing & best hopes your back is 100% soon~
Michelle
Thank you so much for this tutorial!!! I LOVE these feathers:) I plan on making them very soon:)
ReplyDelete~Debra xxx
Capers of the vintage vixens
That is so amazing !!!
ReplyDeleteThank you for the wonderful tutorial ~
xoxo
Lori
I absolutely love your tutorial, thank you very much, I just became your follower.
ReplyDeleteHave a great Thursday!.
Ido
I just awarded you with the "Stylish Blogger Award". Please visit me at my blog to accept your award! Follow the directions. Congrats! Tiff http://thecrankyqueen.blogspot.com
ReplyDeleteWhat a great idea! Thanks so much for the tutorial on these lovely feathers. I want some of my own!
ReplyDeleteWOW! Just found you through Dawn! I love this tutorial....those feathers, those BEAUTIFUL feathers!!! Thank you so much for sharing how to make them. I am going to have to get "her" to make a whole bunch of them for me....you know being a cat and all it's hard to get my little paws to work with scissors. Besides, I would get so excited at the final product that I'd be running through the house with those scissors and might accidently cut off a whisker. Or maybe my sisfur's whiskers....hmmmmm, now there's a plan ;)
ReplyDeleteHave a grand weekend!
Purrs!
Romeo and "her"
I found your blog today and love it!
ReplyDeleteWhat a great idea! These feathers are stunning! Thanks so much for the tutorial! Can't wait to give this a try.
Enjoy the day!
Gaby xo
Hi Karen,
ReplyDeleteI came over from Barbara's...what a great tutorial! (I thought you had covered a real feather with music paper! lol)
I sure hope that your back is feeling better soon!!
XO
Love this...I will definitely have to make some of these to share with friends.
ReplyDeleteThanks...Linda
HI Karen,
ReplyDeleteI have been here before but Dawn sent me today with your feather tutorial! I just adore it!
Thanks for sharing!
Smiles, Cyndi
Thank you so much for your tutorial. I am going to try making them some time. I have printed it off and put it in my 'to-do'book.
ReplyDeleteI came to visit after Dawn showed your beautiful feather. What a lovely blog! I'll be back to visit again! Thank you for sharing your lovely creativity!
ReplyDeleteElaine
These are so pretty; I am going to make a dozen of them…
ReplyDeleteThank you for this wonderful tutorial …
Louise
wow these are just beautiful, thank you for the tutorial!
ReplyDeleteI just finished making two of your beautiful feathers. Again, thank you so much! These are fun and lovely! Think of all the different types of paper we can use. I plan to tuck my feathers into a flower arrangement.
ReplyDeleteXO Diane
I love these paper feathers--they are wonderful! How clever you are!
ReplyDeleteBeautiful tutorial,thanks;-))m
ReplyDeleteHi Karen, congrats on being one of the winners of Sonya's giveaway. I love your paper feathers. Barbara Jean blogged about them. Just lovely! I hope your back is much better by now. Best wishes and blessings, Tammy
ReplyDeleteHi Karen!
ReplyDeleteYou are winner #2 of my giveaway! Please let me know what your address is and I will get it sent out to you! Congratulations and I hope you enjoy them!
I hope your back is feeling better too!
Hugs,
Sonya
i just came from Sonya's blog! congratulations on your win! what a blessing!
ReplyDeleteThanks for this really fun tutorial. I love your use of sheet music and the book pages are a nice look too.
ReplyDeleteYou blog is so inspiring!! I love the feathers so much I immediately starting making some..they are drying now. Can't wait to start cutting. I love the little cupboard mouse...share him please. I'll be back often.
ReplyDeleteI LOVE these feathers.... what a clever idea. Thank you for sharing!!!!
ReplyDeleteThanks so much for tutorial on the wings. I can't wait to give it a try.
ReplyDeleteBe still my heart...the feathers are absolutely lovely! Thank you most kindly for sharing the tutorial.
ReplyDeleteBe well...
OH my Gosh!!!!! This is fabulous!!!!! Thank you for much for your easy to understand tutorial.....I will be making these for sure....hope your back gets better.....I know from experience.... lay flat.....knee on top of pillows will give you some relieve....
ReplyDeleteAS if you didn't already know that the world loves your idea . . . :) I have to add my 2 cents! It is a lovely and timely idea! I love it! Thank you!
ReplyDelete~Debbi
Great project! Thanks!
ReplyDeleteFabulous AND easy project?! My favorite! There are so many possibilities with these! Looks great!
ReplyDeleteNikki
love this! tfs!
ReplyDeleteLove these! Thanks for sharing!
ReplyDeleteFrom Shabbie Jammie Sister...
ReplyDeleteWhat a beautiful feather, can't wait to make one very soon.
Love you blog, too.
DSS
Beautiful artwork.
ReplyDeleteI just discovered your blog.
I am an art teacher looking for inspirational blogs.
I design a lot of mixed-media projects for my students.
Your page feather project is gorgeous.
WOW...this is wonderfully creative, kudos to you, AND i thank you much for sharing! :)
ReplyDeleteSo cute! I mentioned you in my blog.
ReplyDeleteLoves!!
-Amanda
Karen, I am now a follower but I saw the pic of your feather on Pinterest and just made some based on the picture. Thank you for sharing this with the blogworld.
ReplyDeleteThe feathers speak peace to me and I use a shape note songbook from 1866 that was in pieces to make mine.
Blessings to you~
Pam
Thanks so much for the tutorial! Love these feathers!
ReplyDeleteHello from Toronto,
ReplyDeleteLove these paper feathers!
Gabriela
love this project, tell me do u hv to use tacky glue for this or does mod podge or collage pauge work? Is tacky glue necessary?? thks
ReplyDeleteemail me back
bonnieangel1797@gmail.com
This is so beautiful and so creative . What a fabulous project.. many thanks for sharing this. hazel
ReplyDeleteThese feathers are wonderful. Thank you so much for the excellent tutorial. You explained everything really well.
ReplyDeleteLove the feather tutorial. Thank you for sharing your beautiful talent. I'm your newest follower. ~Have a wonderful day and blessings always~
ReplyDeleteLovely, I found you via Pinterest and look forward to making some paper feathers.
ReplyDeleteLove this so much!
ReplyDeleteAs someone who actually writes with a real quill feather I love this idea....and they look so good out of old hymn sheets....it would almost seem possible to get two of these out of the sheet of paper you used?
ReplyDeleteMay the Great Physician heal your back - have just realised that this post is dated for March last year so certainly hope you are ok again.
What a lovely idea! Thanks for sharing! I found you through The Urban's blog.
ReplyDeleteI found this on Pinterest and think that they are beautiful. I found one of my older hymnals that has water damage but can't bear to throw it away. What a wonderful use for the hymns that have so much meaning for me. Thanks for a great tutorial.
ReplyDeletemerci pour ce tuto, je me suis permise de faire un lien sur mon blog.
ReplyDeletej'ai passé un très bon moment en visitant vos messages
à bientôt ...
I made one of these for my Sweetie for his birthday, using a page of sheet music of a favorite song of ours. He loved it. Thanks for the inspiration!
ReplyDeleteGet well soon and thank you for the tutorial!
ReplyDeletethis is great ! I'll sure be making these soon !
ReplyDeletethanks for sharing !!
Sylvie, from France
It is a wonderful tutorial! I made mine just here:
ReplyDeletehttp://belladonnacrafts.blogspot.com/2012/03/pierzaste-gniazdko.html
was fuer eine schoene Idee - genau richtig fuer die Osterzeit !!!
ReplyDeleteliebe Gruesse aus Deutschland
Jacqueline
Just found these through Pinterest and I can hardly wait to make some for my husband. He is a song leader for our church and collects vintage hymnals. I think they'd also make great stocking stuffers at Christmas.
ReplyDeletefound this on pinterest. So super cute.
ReplyDeleteBeautiful ides :-)
ReplyDeleteBonjour,
ReplyDeleteI have put a link to your blog from my blog.
I hope is a good thing for you and you a not angry by that.
Please, excuse my bad english
Miaou
I saw the feathers and thought "this is going to be too difficult to make"....but WOW!!!! So glad you shared this tutorial with us. And I'm also glad that I found your blog......it's wonderful!!!!
ReplyDeleteNice! Thanks for this tutorial.
ReplyDeleteJac@Mesin Fotocopy
I just stumbled upon your tutorial and wanted to mention that I've truly enjoyed browsing your blog posts. After all I will be subscribing to your feed and I hope you write again very soon!
ReplyDeleteJakarta Hotel
all i can say is...these are absolutely beautiful, thank you so much for sharing your technique in making these...i will be making these with my children (ok, probably just the girls)this summer and i can see SO many possibilities to use these feathers. Thanks again!
ReplyDeleteJust FYI - the correct term is "copyrighted" not "copywritten."
ReplyDeletehttp://www.beedictionary.com/common-errors/copywrite_vs_copyright
Found this linked on Craft Dabbler Toni's blog and just had to come over and investigate! These feathers are just amazing - what a simply beautiful idea! thanks for sharing the technique, which I am definitely going to try.
ReplyDeleteShoshi
I cannot wait to make these and the butterfly! I love your blog. Newest follower!
ReplyDeleteLove this it blew me away..........Angel feathers!!!! Amazing cant wait to share this idea with my crafting friends at church thank you so much!!
ReplyDeletethis was so beautiful! I have no words... xo
ReplyDeletewhat a very lovely idea! I have to try it! I like your blog!
ReplyDeleteThank you for this wonderful tutorial - pinned a link back to your blog.
ReplyDeleteque lindo tutorial y tan sencillo , gracias
ReplyDeleteWow thank you very much for this nice idea!!!!!
ReplyDeleteManu
Just saw this on Pinterest. Love this!! WIll definitely try one or two or three... Thanks!
ReplyDeleteThinking about making a song bird <3
ReplyDeleteSaw this on pinterest and came to check it out. Great tutorial. Will also pin because I definitely want to make a few of these. TFS
ReplyDeleteI love these paper feathers--they are wonderful!
ReplyDeleteI do like self made card stuff is a joy too see on my card bybyby tanja
Well, here I am just now March 2013--2 yrs after this post.
ReplyDeleteAwesome, awesome, awesome feathers!
I just made a very sophisticated Steampunk top hat and wanted a feather or something for it. Just buying a feather seemed beneath this treasure I just made. I think I'll print a copy of my husband's grandfather's steam ship papers for travel to the US. The hat is a gift for my son (23 yrs old) for Easter. I didn't have girls so no Easter bonnets to create.
And this is why I love the internet!
Thank you so much for this fantastic tutorial !! What a nice idea !!
ReplyDeleteIf you want to look - here you can find my first feather:
http://www.stempeltruhe.blogspot.de/2013/05/federleicht.html
Gabi
Hello! I'm here visiting from the Pinterest party. Your feathers are just beautiful and I'm so glad I came over to see them. Several times a year, I do craft activities with the children at my church, and this would make a wonderful activity for them. I will probably adapt the instructions somewhat, but I love the idea of using old sheet music or hymnals to create them. Thanks so much for sharing!
ReplyDeleteI love your feathers, and even better that they are made from hymn music sheets. Thanks for sharing the how-to. :-)
ReplyDeleteHis blessings,
Kim @ Curtain Queen
I love these, I can't wait to try them!
ReplyDeleteWhat a wonderful tutorial... thanks for sharing your lovely feathers!
ReplyDeleteSaw these on Pinterest, had to Pin it to my DIY board. I'm linking back to your beautiful Hymnal page feathers in a post I'm doing on DIY bookmarkers. I absolutely love these! Love your blog, will be following you on social media. Shirley @Intelligentdomestications.com
ReplyDeleteThankyou for sharing this feather making. I'm making tags with the ocean theme, using a few postage stamps with Albatross on them, the final flourish to the image will be a feather. Thankyou for the tutorial....i find people on Pinterest generous with what they/you share!
ReplyDeleteI live in New Zealand on the rugged coast of Wellington! Could I post pics of the tags when they're finished, on this site?
ReplyDelete